Opportunities
An Opportunity refers to the potential patient or practitioner who contacted the organization about being serviced / providing services. The opportunity is where the intake process is tracked.
Create a Patient Opportunity
Click '+ Patient Opportunity' on the Opportunities main view in the CRM to create a new opportunity. Opportunities can also be automatically created through qualifying leads.
The Opportunity Info tab is for general patient information, usually collected upon intake. This tab is divided into a few sections:
Opportunity Info -
- Patient - to open an opportunity for an existing patient, choose from existing patients. Otherwise, skip this field.
- First Name
- Last Name
- Gender
- Date of Birth
- Primary Contact - to choose an existing related contact (e.g., a parent with another child already in the system), choose from existing contacts. Otherwise, skip this field.
- Primary Contact First Name
- Primary Contact Last Name
- Primary Contact Email
- Primary Contact Cell Phone
- Primary Contact Home Phone
- Related As - select how the related contact entered above is related to the patient.
- School - select the patient's school (schools can be set as either referral accounts if the school is a referral partner, or as an account with type “Other”).
- Current Situation - take notes of the patient's current care setup and other information relevant for intake.
- Client Need - take notes of the patient's care needs and other information relevant for intake.
- Proposed Services - take notes of proposal that was made to the patient during intake or other ideas for patient care.
Patient Address -
- Location Description - give the location a clear name for easy reference (e.g., Steven's summer home). This is how the location will display in Note if the patient gets services at this address.
- Location Type - this is how the place of service will be set on claims if the patient gets services at this address. Learn more about locations.
- Address Type - If the Location Type is 'Home,' the address type must be specified as 'Billing Address', 'Service Address' or both. A Patient can only have 1 address as their 'Billing Address' at any time.
- Address Search- search for the patient's address to populate the address fields
Conditions- When the opportunity is saved, a condition will be created based on the information filled out in these fields. Additional conditions can be added after saving the opportunity by clicking 'New Condition' on the condition subgrid. Learn more about conditions.
- Condition Code - select the condition code that matches the patient’s diagnosis.
- Diagnosed By - select the contact that diagnosed the patient, or create a new contact (contact type can be set to 'External Contact').
- Onset - enter the date this condition began or was diagnosed on.
Coverages - When the opportunity is saved, a coverage will be created based on the information filled out in these fields. You will then be able to check eligibility from the coverage subgrid on the opportunity.
- Plan - Select the insurance plan the patient is covered under.
- Member ID - Enter the Member ID as it appears on the patient’s insurance card. The member ID is transferred to the claim. It also enables you to run eligibility checks from within the Autism Care app and receive accurate responses.
- Start Date - Enter the start date for this coverage.
- End Date - Enter the end date for this coverage.
Referral Info -
- Referred By - select the individual at the account who referred this patient.
- Referral Account - select the account who referred this patient (e.g. care management association, physician's practice, etc.). Learn how to set up referral accounts.
- Marketing Source - select the source this lead was generated from (your website form fill, a facebook ad campaign, etc.). Learn how to set up marketing sources.
- Marketer - select the individual at your organization responsible for bringing in this lead.
Application Info - track what stage this patient is at in the intake process by entering the following information:
- Application Sent Date - enter the date the application was sent.
- Application Received Date - enter the date the application was received.
- Application Revisions Requested Date - enter the date the application was sent back to the parent for revisions if relevant.
- Application Approved Date - enter the date the application was approved.
- Insurance Card - toggle on when the insurance card has been received.
Patient Preferences -
- Preferred Schedule - enter the patient's availability for services.
- Preferred Start Date - enter the desired start date for services.
- Service Location - select the patient's requested service location(s) (home, clinic, school, etc.).
- Telehealth Staffing - if the patient is comfortable with receiving services via telehealth, set this to yes.
- Preferred Languages - Select the languages that the patient is comfortable communicating in.
- Provider Gender Preference – if the patient has a preference to the practitioner gender, set it here.
- Preferred Cultural Background - if the patient has a preference to the practitioner cultural background, set it here.
Timeline - This is a running timeline of any communications or interactions with or regarding the patient. Emails, phone calls, encounters, tasks, and notes related to this patient are all tracked here. This timeline is also present with all entries on the patient's contact profile. You can also initiate emails, phone calls, and tasks directly from the timeline by clicking the ‘+’ button on the timeline.
The Documents tab is for uploading patient intake documents such as insurance card, application, or other relevant documents. These documents will be available on the documents subgrid on the patient contact profile.
- Patient Documents - documents will be created for patients when a coverage is added on the opportunity, so you can fill out the received date and expiration date (if relevant) of each document required by the payer. Learn more about patient documents.
- Upload Documents - upload patient intake files such as insurance card, application, or other relevant documents to the patient's sharepoint folder. These documents will be available on the documents subgrid on the patient contact profile.
The Authorization Workflow tab is for tracking the process for obtaining this patient's first authorization. Learn more about authorization workflows.
Patient Opportunity Workflow
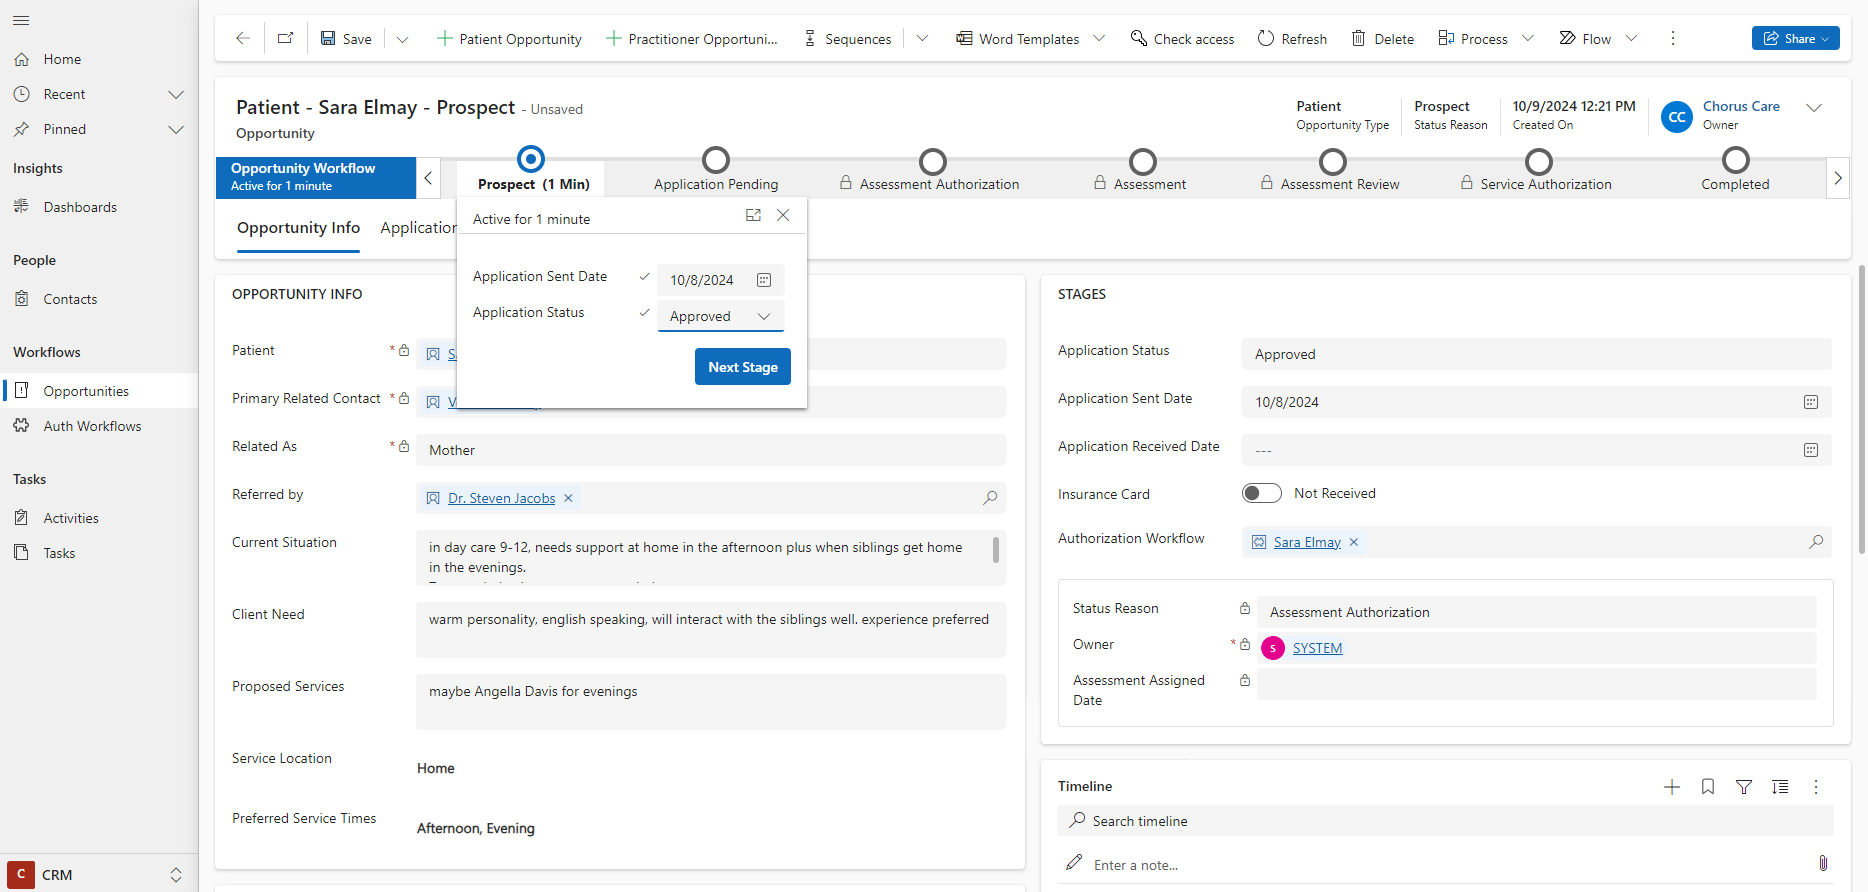
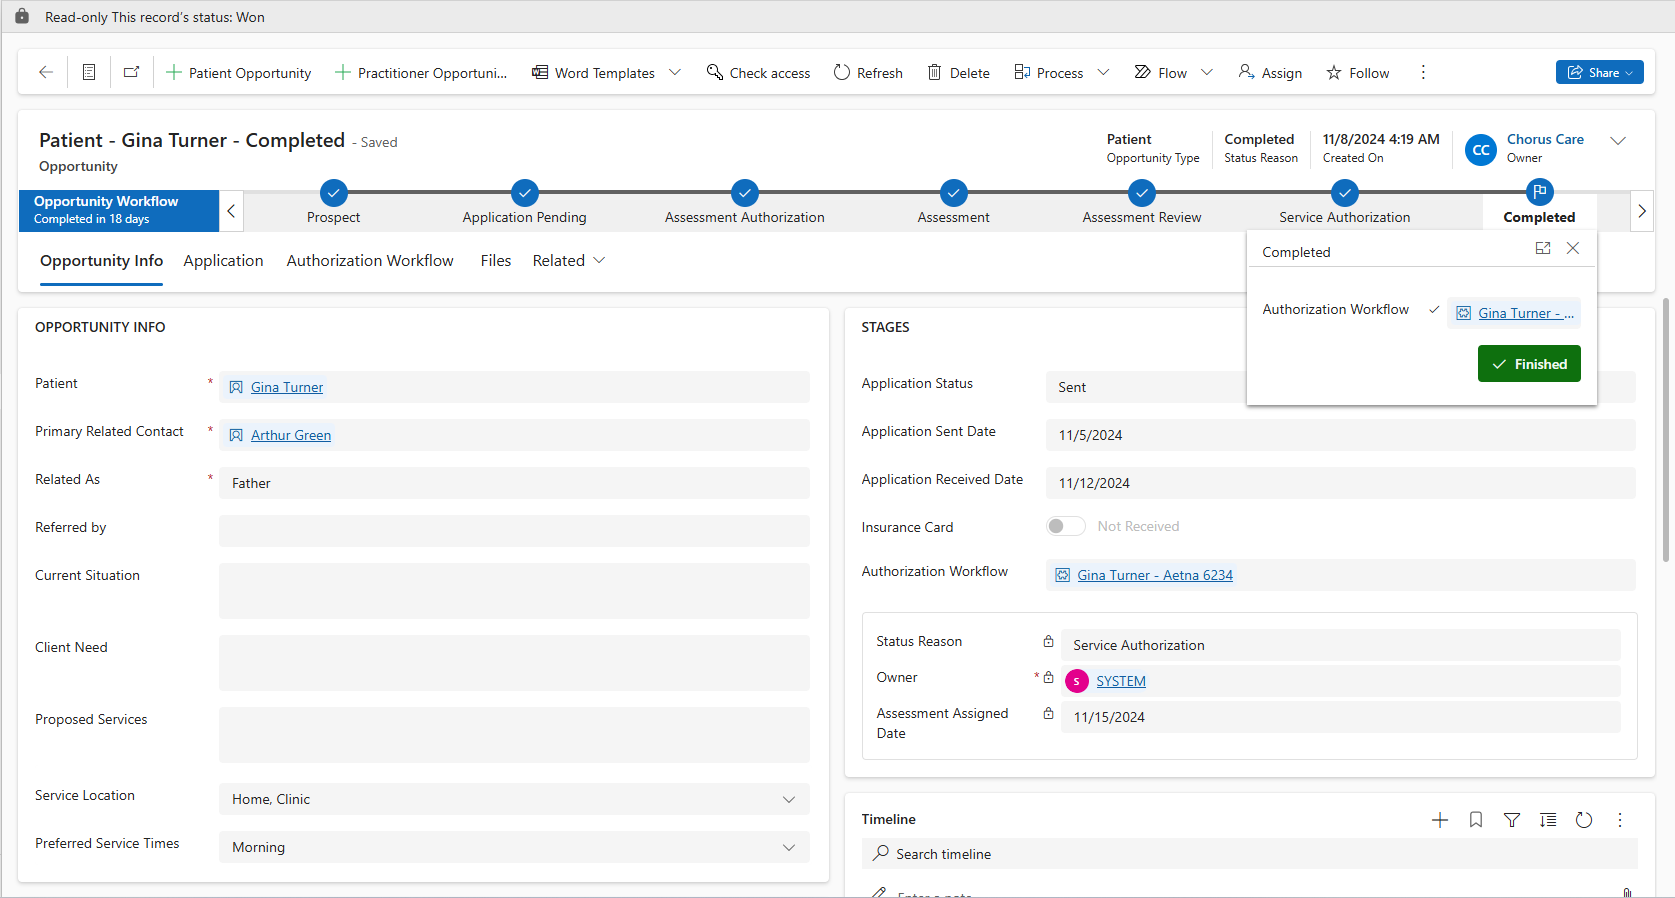
Patient Opportunities have 7 stages:
- Prospect
- Application Pending
- Application Review
- Assessment Authorization
- Assessment
- Assessment Review
- Service Authorization
A patient opportunity is created at the Prospect stage. (If the opportunity was created from a qualified lead, it will be created at either the 'Application Pending' or 'Application Review' stage.)
Once an application has been sent to the parent to complete, enter the Application Sent Date and click 'Next Stage' to move the opportunity to the Application Pending stage.
Once the application has been received, enter the Application Received Date and click 'Next Stage' to move the opportunity to the Application Review stage.
Once the application has been reviewed and approved, click 'Next Stage*. The remaining stages of the opportunity take place on the authorization workflow. Learn more about authorization workflows.
Patient Opportunities are closed as 'Won' when the authorization is populated on the authorization workflow and the workflow is marked as Finished.
Patient Intake Stream
Use the Patient Intake Stream to efficiently work through open patient opportunities. Filter by any visual on the dashboard to filter your stream and allow you to take next steps on open records easily:
- Intake specialist
- Opportunity status reason
- Week the opportunity was created
- Referral account
- Business unit
You can also jump to your open tasks or phone calls from the tiles on the right side of the dashboard.
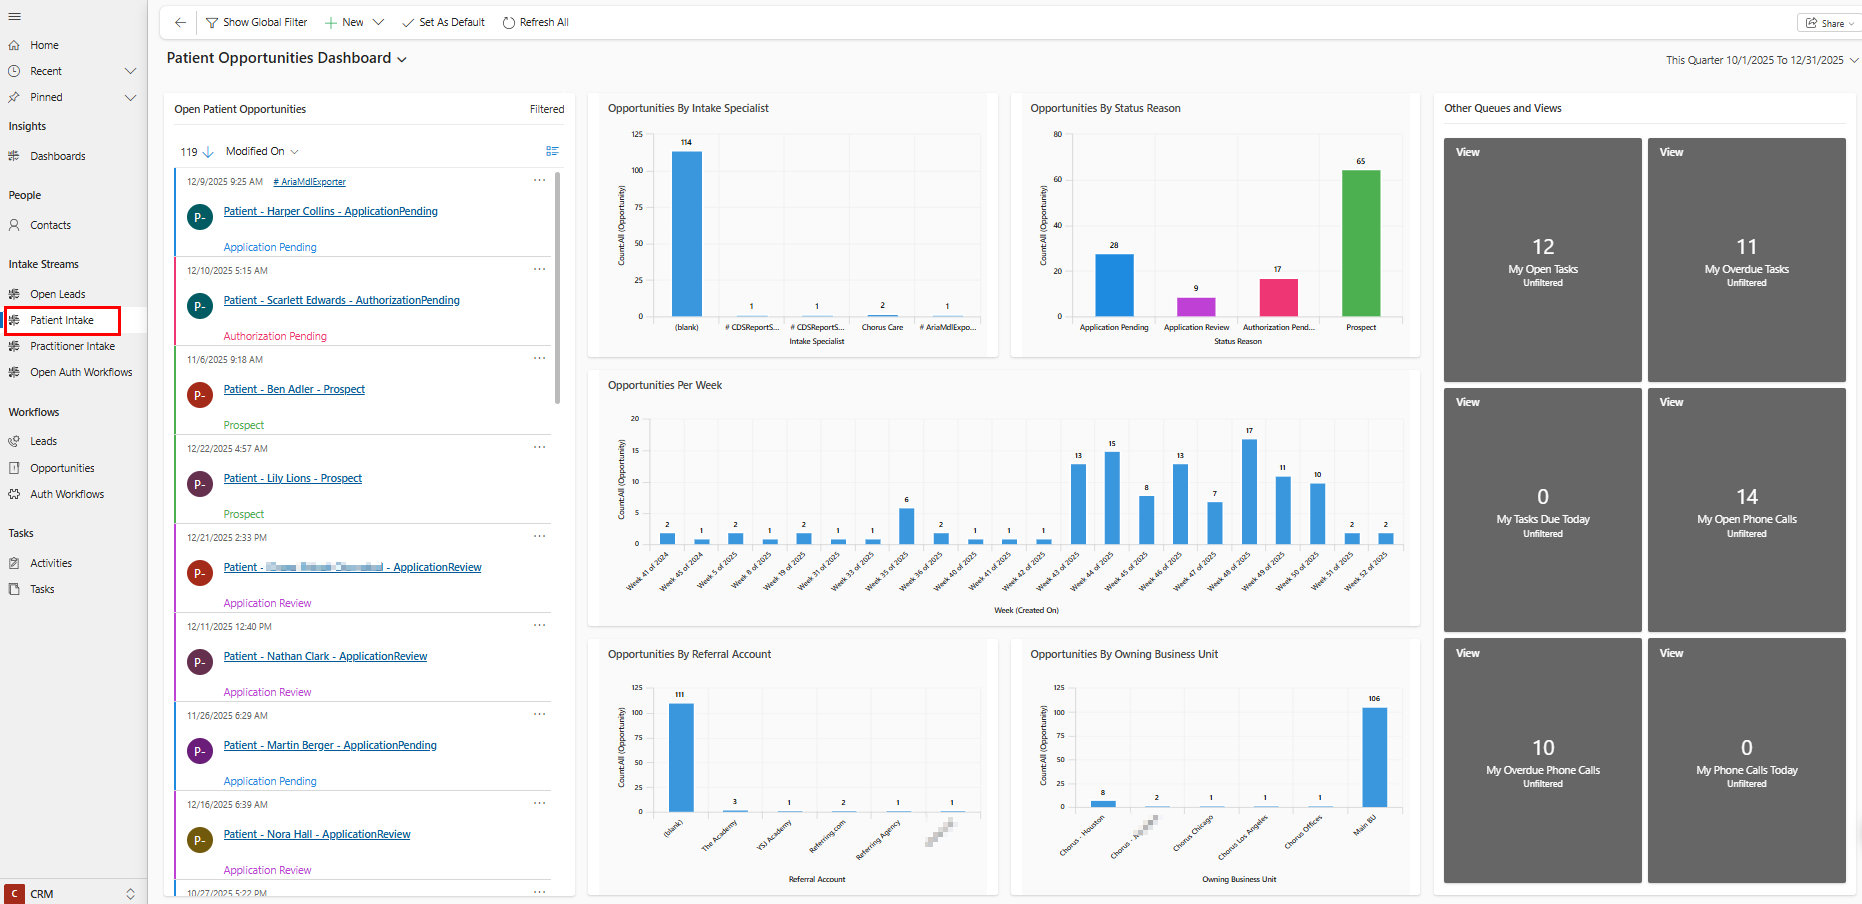
The filter at the top right of the report can be ignored- at any time, all open patient opportunities will show regardless of when they were created.
Create a Practitioner Opportunity
Click '+ Practitioner Opportunity' on the Opportunities main view in the CRM to create a new opportunity. Opportunities can also be automatically created through qualifying leads.
The Opportunity Info tab is for general practitioner information, usually collected upon intake. This tab is divided into a few sections:
Opportunity Info -
- Practitioner - If this opportunity represents a practitioner who was previously employed by the organization and is returning, choose from existing contacts. Otherwise, skip this field.
- First Name
- Last Name
- Gender
- Date of Birth
- Email Address
- Secondary Email Address
- Cell Phone
- Preferred Contact Method
- Primary Role - choose the primary practitioner role the provider will be serving at the organization. Learn more about practitioner role definitions.
- Provider NPI Number - the NPI number populated on the practitioner contact will display on the opportunity.
- Proposed Employment - take notes of proposal that was made to the practitioner during intake or other ideas for practitioner service delivery.
Practitioner Address
Referral Info
- Referred By - select the individual at the account who referred this practitioner.
- Referral Account - select the account who referred this practitioner (e.g. college, recruiting company etc.) Learn how to set up referral accounts.
- Marketing Source - select the source this lead was generated from (your website form fill, a LinkedIn ad, etc.). Learn how to set up marketing sources.
- Marketer - select the individual at your organization responsible for bringing in this opportunity.
Interview Info
- Interview Needed - toggle on if an interview is required as part of the hiring process for this opportunity.
- Interview Date - enter the date of the interview once it has been scheduled.
- Interview Notes - take notes from the interview
- References - enter reference contact information if relevant.
- References Notes - take notes from contacting references.
Practitioner Preferences
- Preferred Schedule - enter the practitioner's availability for services.
- Preferred Start Date - enter the practitioner's desired start date.
- Preferred Service Location - if the practitioner has a preference to where they will be providing services (home, clinic, school, etc.), set it here.
- Travel Preferences - enter the practitioner's travel preferences, if any (e.g, willing to travel 30 minutes by bus for sessions).
- Telehealth Staffing - if the practitioner is providing services via telehealth, set this to yes.
- Preferred Languages - select the languages that the practitioner is comfortable communicating in.
- Patient Gender Preference - if the practitioner has a preference to the patient gender, set it here.
- Preferred Cultural Background - if the practitioner has a preference to the patient cultural background, set it here.
Timeline - This is a running timeline of any communications or interactions with or regarding the practitioner. Emails, phone calls, encounters, tasks, and notes related to this practitioner are all tracked here. This timeline is also present with all entries on the practitioner's contact profile. You can also initiate emails, phone calls, and tasks directly from the timeline by clicking the ‘+’ button on the timeline.
The Additional Info tab is for other pieces of information that will be added at later stages in the opportunity workflow. When the opportunity is at a later stage, these sections will show on the main Opportunity Info tab, and sections less relevant to the advanced stage will show on the additional info tab.
Practitioner Qualifications - click 'New Practitioner Qualification' to create qualifications for the practitioner. The qualifications you create here will be available on the practitioner contact profile. Learn more about practitioner qualifications.
Onboarding Info
- Practitioner Contract - enter the practitioner's contract here.
- Background Check - set whether the practitioner's background check was approved or flagged.
- The Documents tab is for uploading practitioner intake documents such as resume, application, or other relevant documents. These documents will be available on the documents subgrid on the practitioner contact profile.
Practitioner Opportunity Workflow
Practitioner Opportunities have 4 stages:
- Prospect
- Candidate Review
- Offer
- Onboarding
A practitioner opportunity is created at the Prospect stage. (If the opportunity was created from a qualified lead, it will be created at either the 'Candidate Review' or 'Offer' stage.)
Once an interview was conducted or enough information about the applicant is obtained, click 'Next Stage' to move the opportunity to the Candidate Review stage.
Once the the candidate has been reviewed and approved for hire, click 'Next Stage' to move the opportunity to the Offer stage.
Once the practitioner has accepted the position, click 'Next Stage' to move the opportunity to the Onboarding stage.
When a practitioner has been onboarded and trained and is ready to begin services, click 'Finish' on the onboarding stage to complete the opportunity.
Practitioner Intake Stream
Use the Practitioner Intake Stream to efficiently work through open practitioner opportunities. Filter by any visual on the dashboard to filter your stream and allow you to take next steps on open records easily:
- Intake specialist
- Opportunity status reason
- Week the opportunity was created
- Primary role
- Business unit
You can also jump to your open tasks or phone calls from the tiles on the right side of the dashboard.
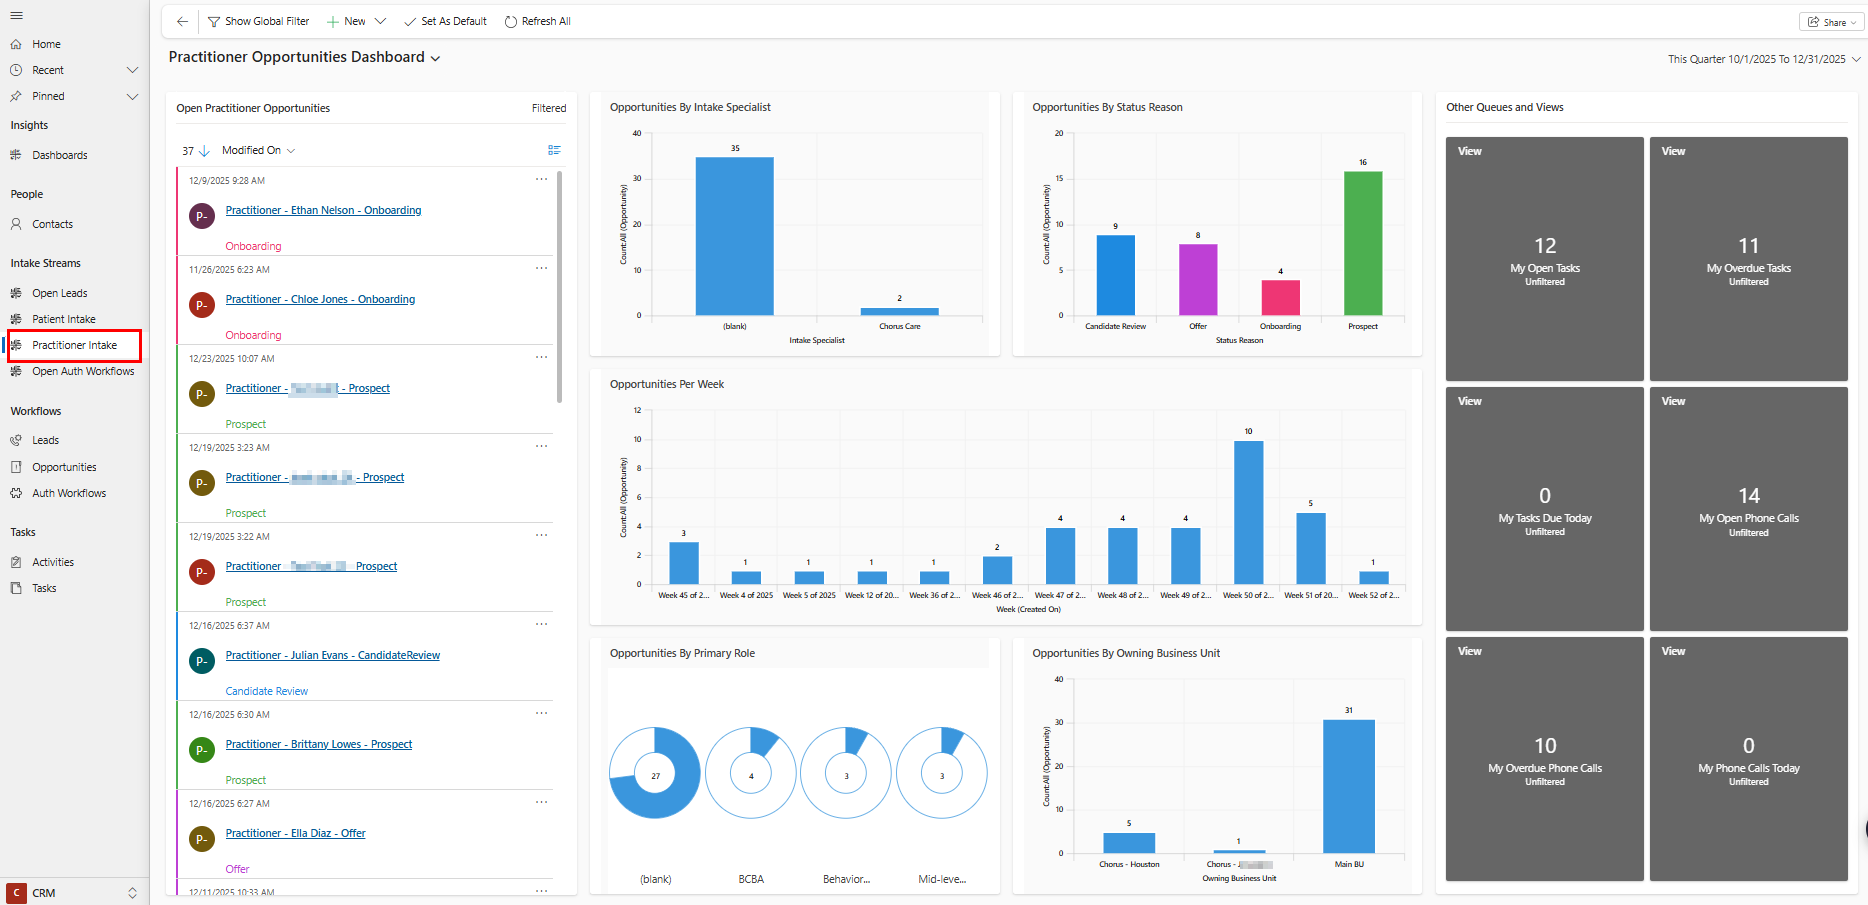
The filter at the top right of the report can be ignored- at any time, all open patient opportunities will show regardless of when they were created.
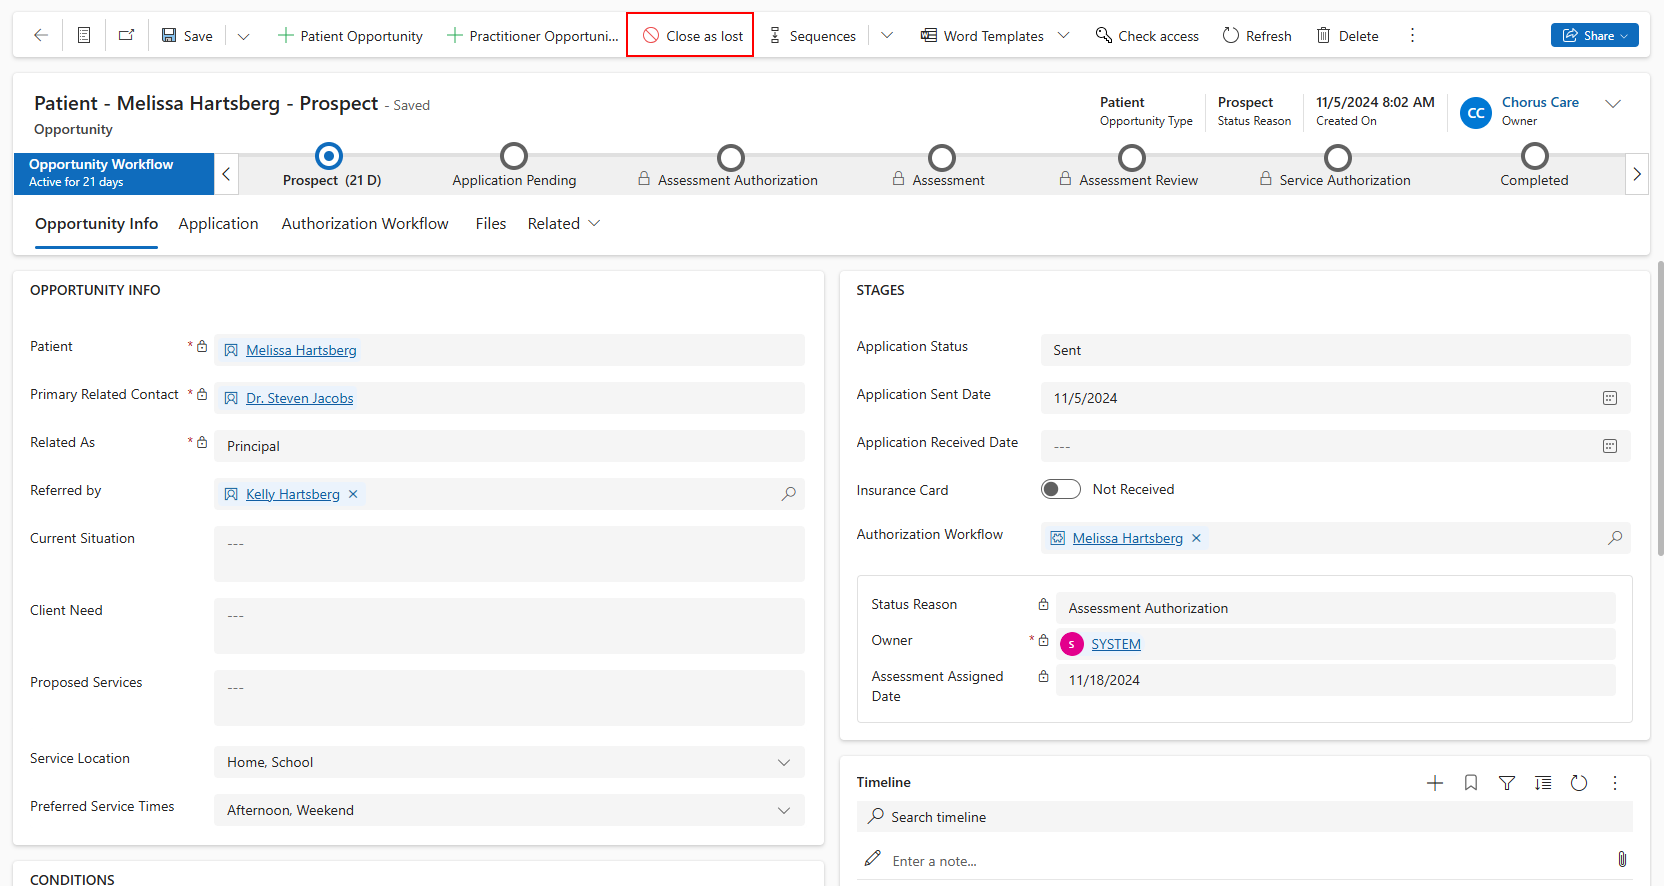
Close Opportunities as Lost
Click 'Close as lost' to close patient/practitioner opportunities as lost and choose the reason. A description of why the opportunity was lost can also be recorded.
- When closing patient opportunities as lost, the opportunity's contact, episode of care, and authorization workflow are deactivated.
- When closing practitioner opportunities as lost, the opportunity's contact is deactivated.
(Patient opportunities can be closed as lost while within the authorization workflow stages.)
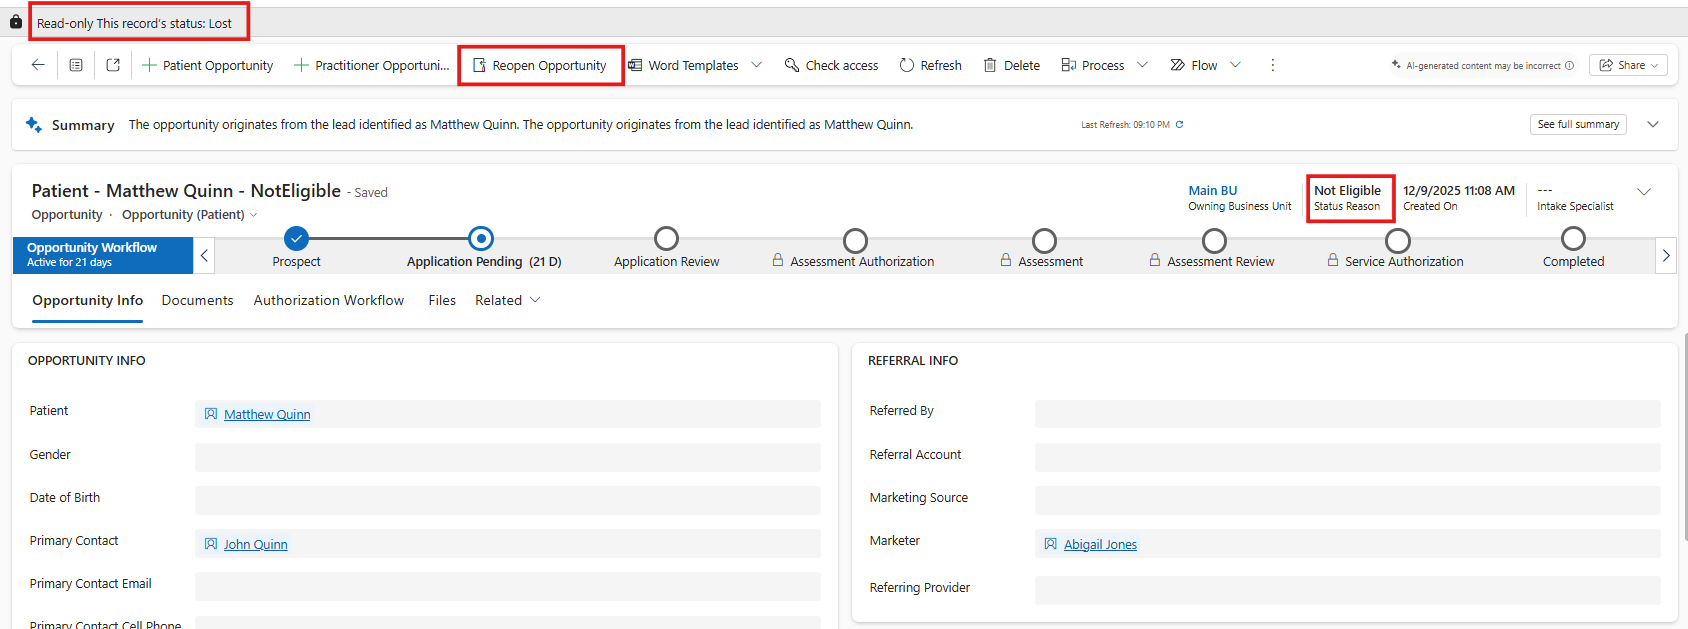
Reopen Lost Opportunities
A lost opportunity can be reopened by clicking 'Reopen Opportunity'. The opportunity will be reactivated at the stage it was at prior to being closed as lost.
The opportunity's contact, episode of care, and authorization workflow will also be reactivated.
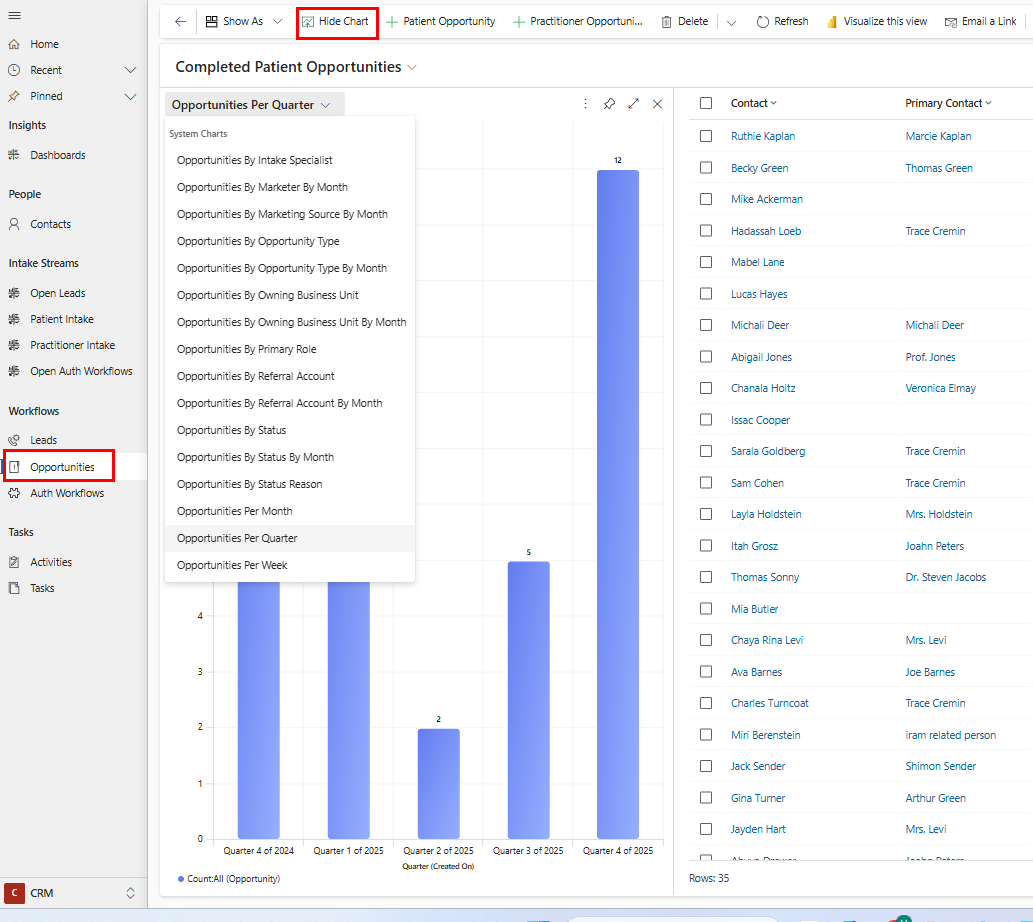
Opportunity Views
Go to 'Opportunities' on the site menu in the CRM Area to open the Opportunity Main Grid and choose from available views:
- All Opportunities
- The All (Patient/Practitioner) Opportunities view displays all the opportunities in the system. This includes Active and Inactive records. (This is helpful when an opportunity is lost and their record is deactivated but later decides to reapply. You can reactivate their opportunity record from this view.)
- Open Opportunities
- The Open (Patient/Practitioner) Opportunities view displays patient/practitioner opportunity records that are not completed.
- My Open Opportunities
- The My Open Opportunities view displays opportunity records where the intake specialist is the user viewing the records.
- Completed Opportunities
- The Completed (Patient/Practitioner) Opportunities view displays patient/practitioner opportunity records that were completed.
- Lost Opportunities
- The Lost (Patient/Practitioner) Opportunities view displays patient/practitioner opportunity records that were closed as lost.
Pair a view with a chart to visualize your data and measure improvement over time. Click 'Show Chart' and choose from:
- Opportunities Per Week, Month, or Quarter
- Opportunities By Status, Status Reason, or Opportunity Type
- Opportunities By Intake Specialist, Marketer, Primary Role, or Business Unit
- Opportunities By Status or Opportunity Type per month
- Opportunities By Marketer, Marketing Source, Referral Account, or Business Unit per month
Opportunity Dashboard
Go to 'Dashboards' on the site menu and select the Opportunity Dashboard to review:
- How many patient vs practitioner opportunities were created each month (for open opportunities, lost opportunities, or all opportunities)
- How many opportunities that were created each month were won vs lost vs still open (for patient or practitioner opportunities, or all opportunities)
- How many opportunities were created each month per business unit (for completed/open/lost patient/practitioner opportunities)
- How many opportunities were created each month per marketing source (for completed/open/lost patient/practitioner opportunities)
- How many opportunities were created each month per marketer (for completed/open/lost patient/practitioner opportunities)
- How many opportunities were created each month per referral account (for completed/open/lost patient/practitioner opportunities)
