Remits Workflow
The Remits workflow happens primarily in the RCM app.
- A transaction is received from the clearinghouse to your financial dimension.
- A payment is automatically created when a payment comes into your clearinghouse. The payment is automatically posted to the claim it was paid against. The payment information fields are updated on the claim.
- A payment can also include a Payment Adjustment (positive or negative) - when the payer wants to make an adjustment that is not related to a specific remit, or when it is for a remit not included in this payment (a past remit for example).
- When the payments/remits are received, they are automatically posted to the claims they are paying up, and can be reviewed to ensure that the maximum reimbursement was received.
- When the system does not identify a claim to post a remit to, you can manually post the "orphaned" remit to a claim. The same goes for posting orphaned remit lines to claim lines. See Posting Orphaned Remits
- Very often, there will be adjustments or denials that the organization can resubmit (e.g., if a claim was submitted with the wrong authorization number, if the payer denies payment as unauthorized, if the payer claims the member is not covered, etc.). The affected claims are then modified and resubmitted and the process begins again.
Correcting Claims
To submit a corrected claim, click 'Modify & Resubmit' on the claim. This generates a copy of the claim in 'Draft' status with claim frequency code 'Corrected', allowing edits to the claim and claim line information. Claim Notes can be added to specify why the claim was corrected- these will be included in box 19 on the CMS-1500 Claim Form.
When the modified claim is ready to be submitted, click the 'Save & Submit' button. The system will run a validation check to ensure the claim has all required fields. If the claim is missing any required fields, a notification banner will display to indicate which fields are missing.
If the validation passes, the status reason of the claim will be updated to 'Ready to Submit', and will be submitted with the next batch of claims being submitted to the clearinghouse.
How to void a claim
To send a voided claim:
- Follow the steps to correct the claim by clicking 'Modify & Resubmit'.
- Clear the claim frequency code "Corrected", and instead choose the code "Voided".
- Click 'Save & Submit' to send the voided claim.
Session Resubmissions
When an encounter service was reopened to allow the practitioner to make edits, if a claim line was already created, the charge item will be set to 'Awaiting Resubmission.'
Review 'Awaiting Resubmission' charge items to determine if the edits made to the session necessitate modifying and resubmitting the claim.
Update charge item from 'Awaiting Resubmission' to 'Claim Line Created' and modify and resubmit the claim based on the updates made to the session.
Submitting Claims to Secondary Coverage
To submit a claim to the patient's secondary coverage, click 'Submit to Secondary' on the claim. This generates a copy of the claim in 'Draft' status, allowing edits to the claim and claim line information. The payer and member ID will automatically update based on the patient's secondary coverage. The coordination of benefits section will appear on the claim and claim lines.
If you attempt to submit a claim to secondary before there is a remit from the primary payer, you’ll need to enter Coordination of Benefits details manually.
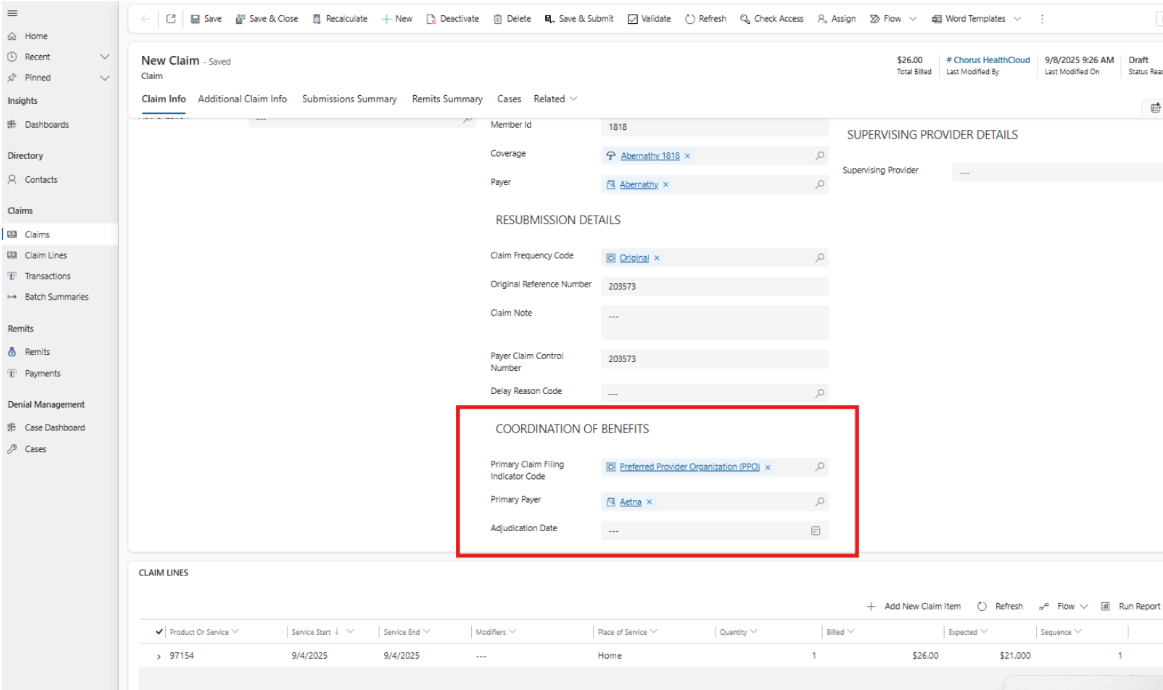
When the claim is ready to be submitted, click the 'Save & Submit' button. If all claim validations pass, the status reason of the claim will be updated to 'Ready to Submit', and will be submitted with the next batch of claims being submitted to the clearinghouse.
Posting Orphaned Remits
Orphaned Remits are remits that come in from your clearinghouse but are not posted to any specific claim.
- Posting orphaned remits to the right claims will help you identify which claim lines the orphaned remit lines should be posted to.
- Posting orphaned remit lines (lines on a remit that were not posted to any claim lines) to claim lines will give you accurate tracking of the outstanding and paid amounts on every claim, as well as on a line-by-line basis.
How to Post Orphaned Remits to Claims
- On a Claim, go to the Remits Summary tab.
- Click 'Add Existing Claim Payment'. You will be brought to a lookup of all Remits.
- With your cursor in the "Look for records" field, press enter. At the bottom of the results, click 'Advanced lookup'.
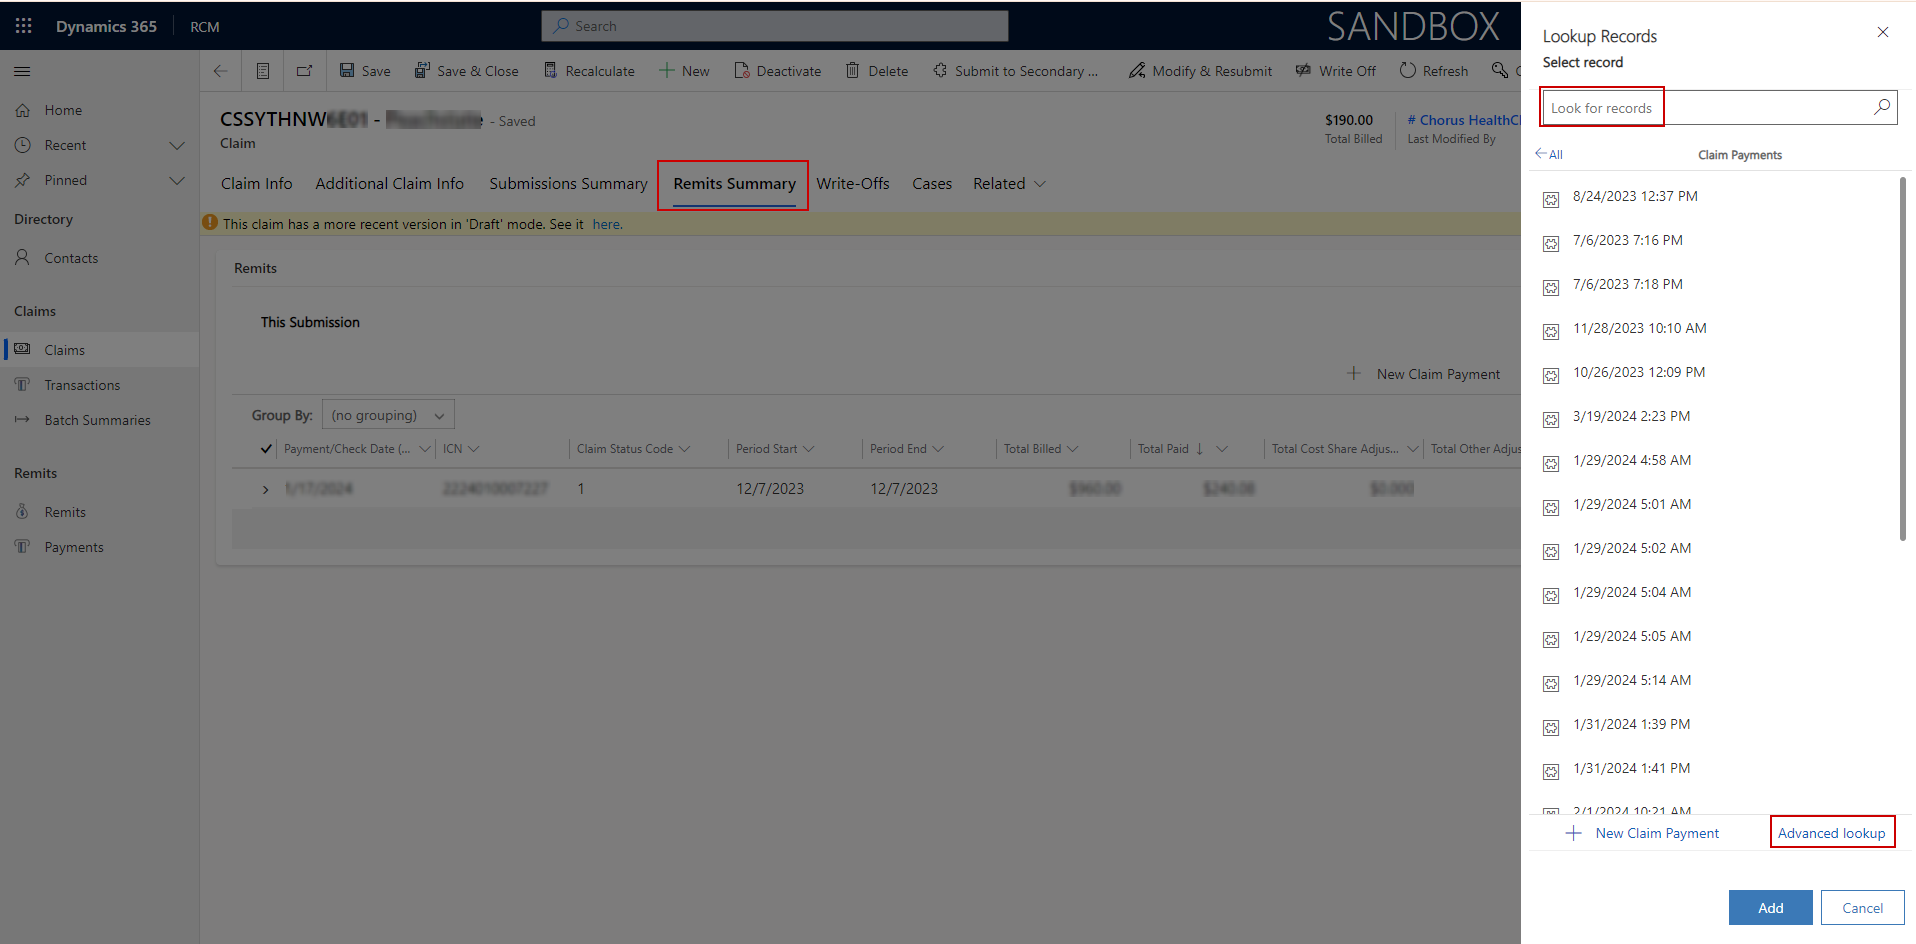
- Switch from the 'Claim Payment Lookup View' to the 'Orphaned Remits' view. Identify the remit for the claim based on the patient/date of service, etc.
Alternately, you can utilize the 'Orphaned Remits' view to go through all orphaned remits and populate the claim field on each remit.
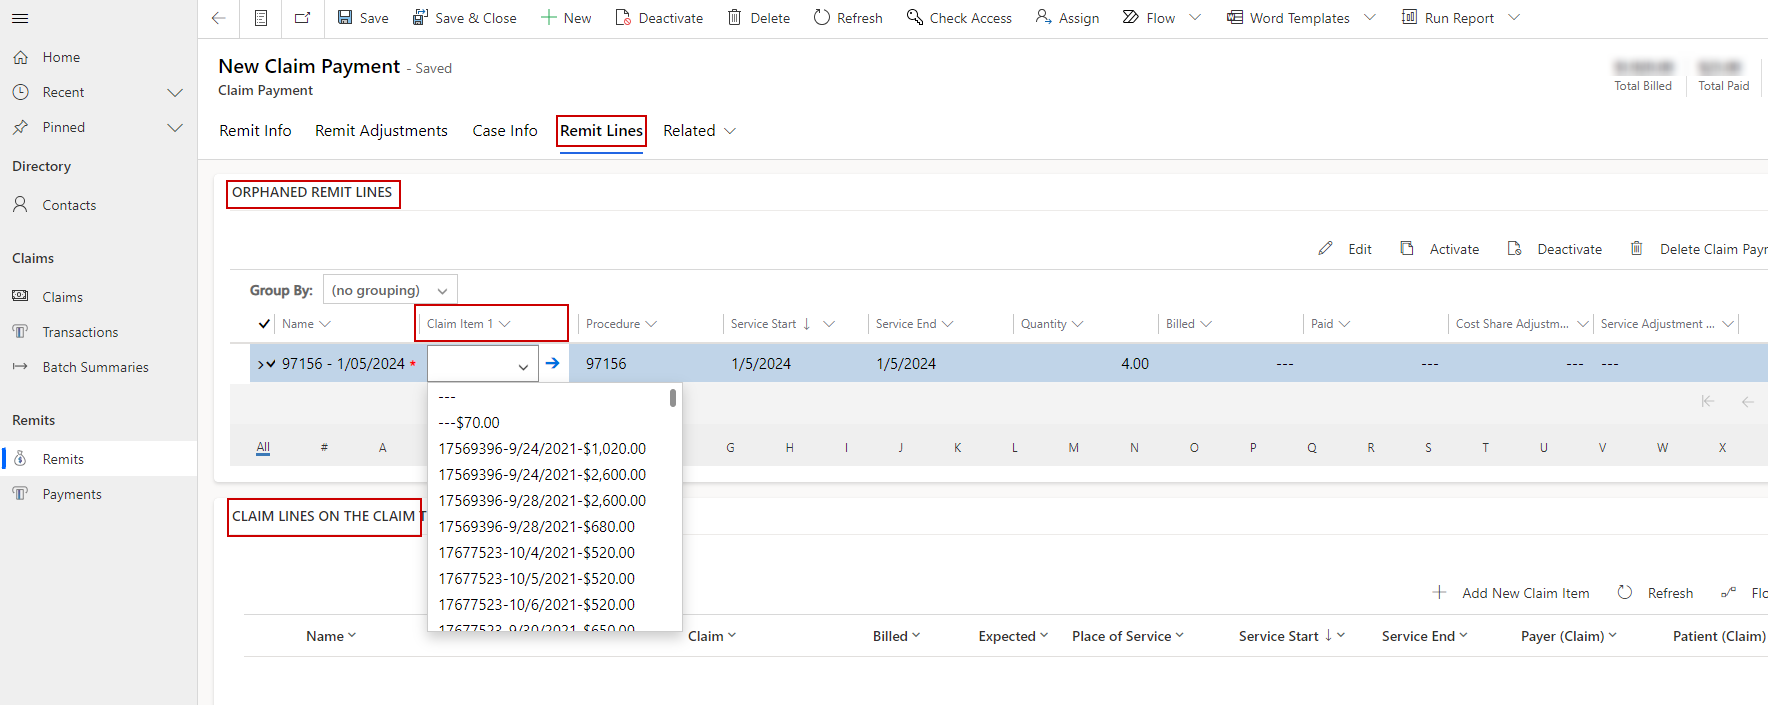
How to Post Orphaned Remit lines to Claim lines
- Use the 'Remits with Orphaned Remit Lines' view to review remits where some of the remit lines have not been posted to claim lines.
- Open a remit and go to the Remit Lines tab. Remit lines that haven't been posted to claim lines display in the 'Orphaned Remit Lines' subgrid.
- Below the orphaned remit lines subgrid, you can review the claim lines on the claim this remit was posted to.
- Identify the claim line to post each orphaned remit to (based on the patient/date of service etc.). Copy the name of the claim line, and paste it into the claim line lookup field on the orphaned remit line.
- Click 'Recalculate' on the claim to view the updated total outstanding and paid amounts based on the remit lines that were posted to the claim lines on the claim.
Posting Cost Share Payments
Remits can be set as cost share remits to pay up the Cost Share Outstanding (cost share balance) on claims and claim lines, rather than the Total Outstanding (payer balance).
Cost Share Remits can be used in the following scenarios:
- Create manual remits to represent patient payments that pay up cost share balances.
- Set automatically created remits that came from secondary coverage as cost share remits if they should be posted towards the cost share balance rather than the total outstanding.
The Outstanding and Paid amounts on the claim are updated when a cost share remit is posted to a claim, or when a regular remit that is posted to a claim is set as a cost share remit.
How to Post Towards Cost Share
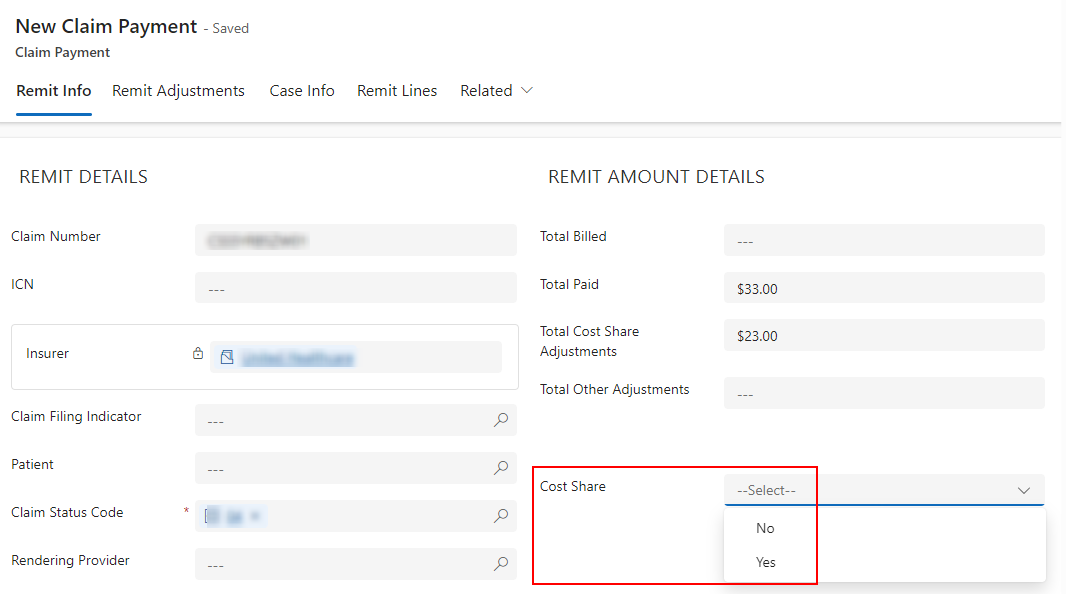
On the claim whose cost share balance should be updated, go to the Remits Summary tab. Click 'New Claim Payment' to create a new remit.
Set the 'Cost Share' field on the Remit to yes. Populate the total paid from all remit lines in the Paid Amount field. Select the payment (or create a new payment) so this remit can be searched by payment #. Save the record.
- Once saved, remit lines for all claim lines on the claim will be populated according to the information on the corresponding claim lines (procedure code, dates of service, quantity, billed amount, etc.).
- Enter the Paid Amount on each Remit Line. Go back to claim and refresh or click 'Recalculate' to get the updated Cost Share Paid and Cost Share Outstanding.
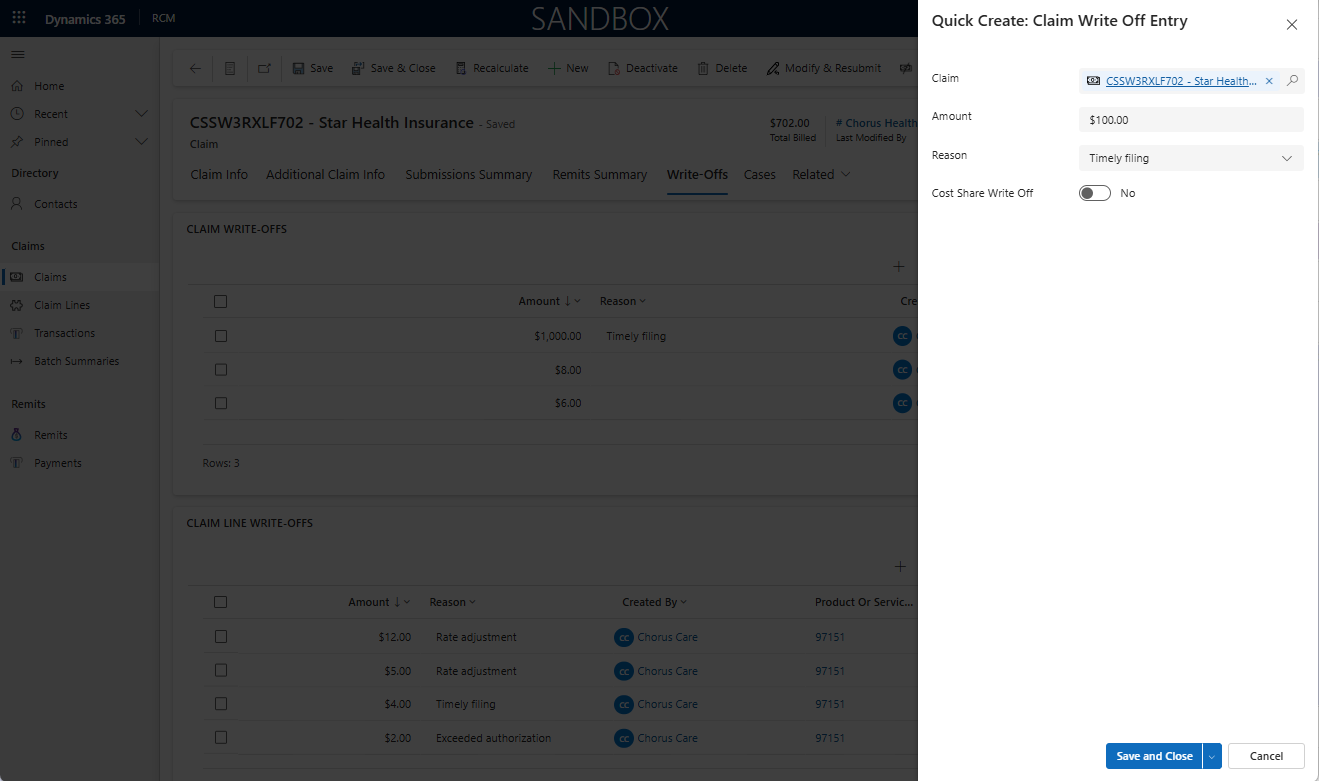
Write-Offs
A write-off can be added to any claim or claim line to deduct from the outstanding balance on the corresponding claim/claim line. To deduct from the cost share outstanding, mark the write-off as a cost share write-off.
To write off the entire outstanding amount / cost share outstanding amount on a claim, use a claim write off, and claim line write offs will automatically be created for all claim lines. For anything less than the entire outstanding amount, use claim line write offs and choose how much to write off for each claim line.
- Open a claim or claim line.
- Go to the Write-Offs tab. Click 'New Claim Write Off Entry' (or 'New Claim Item Write Off Entry' for claim lines).
- Fill in the amount you are writing off and the reason. Click save.
The amount will be added to the total write-offs and deducted from either the total outstanding or the cost share outstanding on the corresponding claim/claim line.