Authorizations
Authorizations are the force behind the entire scheduling and billing workflow. Each encounter is validated against an authorization, to ensure it is scheduled correctly and will be able to be billed.
Create an Authorization
To create a new Authorization, click 'New Authorization' on the Authorization subgrid (on a Patient Contact Form, under the 'Coverages and Auths' tab) or click the 'New' button on the Authorization main view.
Authorization Information
- Patient - prepopulated as the patient whose profile you are navigating from when entering the authorization.
- Episode of Care - prepopulated with the Active Episode of Care record for this Patient.
- Coverage - Populated with the Active Coverage record with the latest End Date (or no End Date) for this Patient.
- If a patient has more than one active coverage, ensure that the selected coverage is the one the authorization is covered by, otherwise select the correct coverage.
- Authorization Number - Enter the authorization number. This will be included on the claims created against this authorization.
- Authorization Type - Select whether this is an assessment authorization (authorizing an initial/follow-up assessment to be completed) or a service authorization. Only service authorizations will generate authorization workflows prior to expiration. Learn more about authorization workflows.
- Period Start Date - Enter the start date that the authorization is valid from.
- Period End Date - The End Date is prepopulated to 6 months after the Start Date, and you can edit it as needed. This is the date the authorization is valid until.
- Practitioner - Select the practitioner on the authorization, if the billing provider on the claim will be an individual (rather than organization). Otherwise, leave blank.
Once the Authorization is saved, Authorization Services can be added.
Claim Settings
This section displays fields related to billing Claims.
Rendering Provider Assignments
- When a claim is generated, the rendering provider will be the practitioner on the session, unless that practitioner does not have the required claim qualifications for the service code.
- If the practitioner on the session does not have the required qualifications for the claim, the rendering provider will be populated with the practitioner on the Rendering Provider Assignment on the authorization (provided that the assignment date range includes the date of the session).
Designate a Rendering Provider for claims based on existing care team assignments, helping your team handle mid-auth restaffing and ensuring rendering providers performed services. Here’s how:
- Open an Authorization.
- Go to the Care Team Assignments tab.
- Select the care team assignment for the practitioner who should be listed on the claim.
- Click “Set as Claim Rendering Provider.” (only Authorization Admins have this permission)
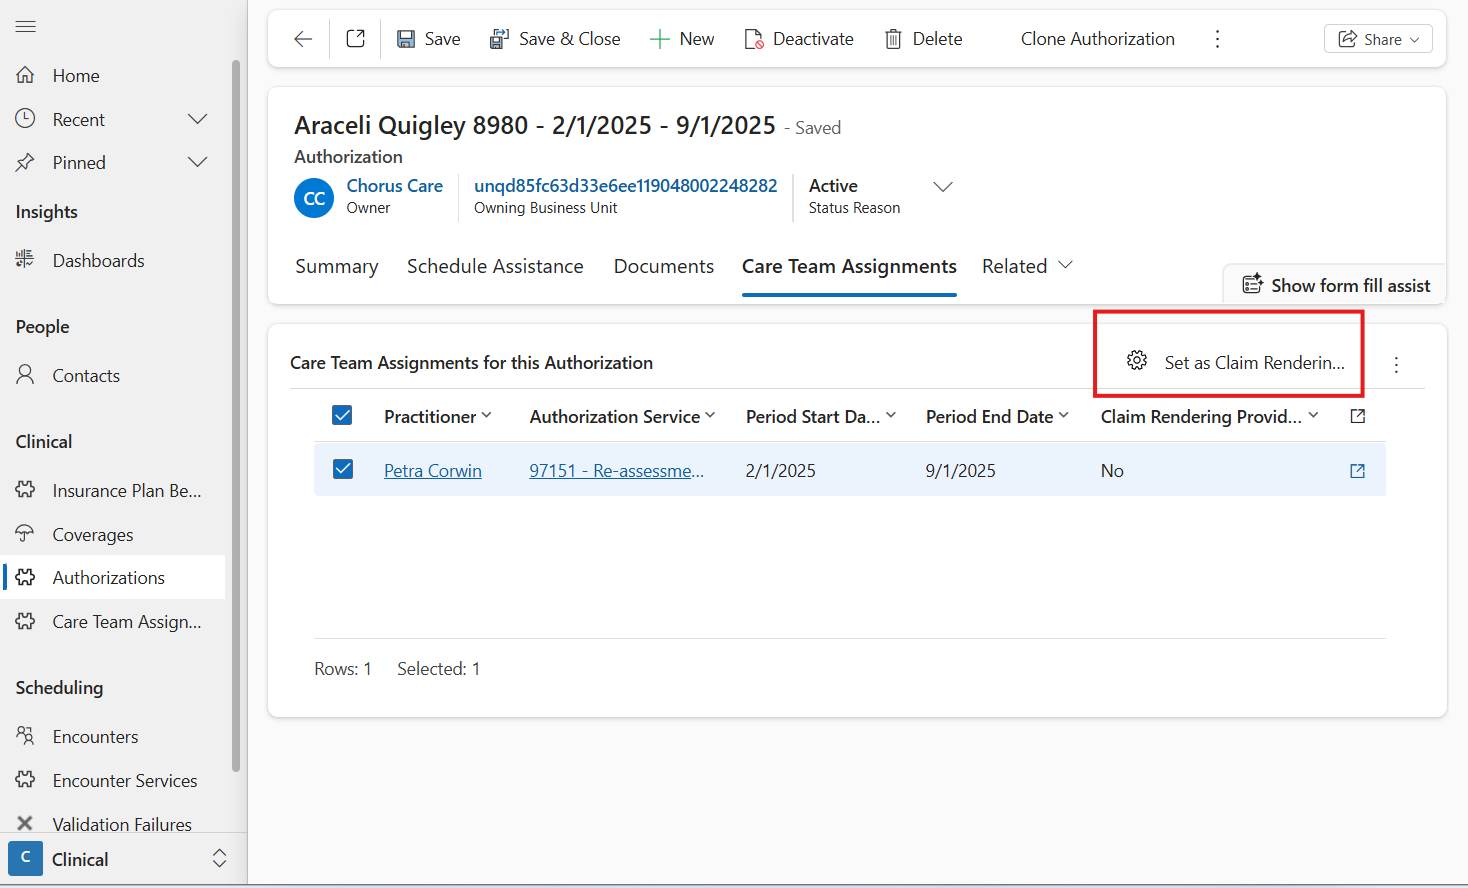
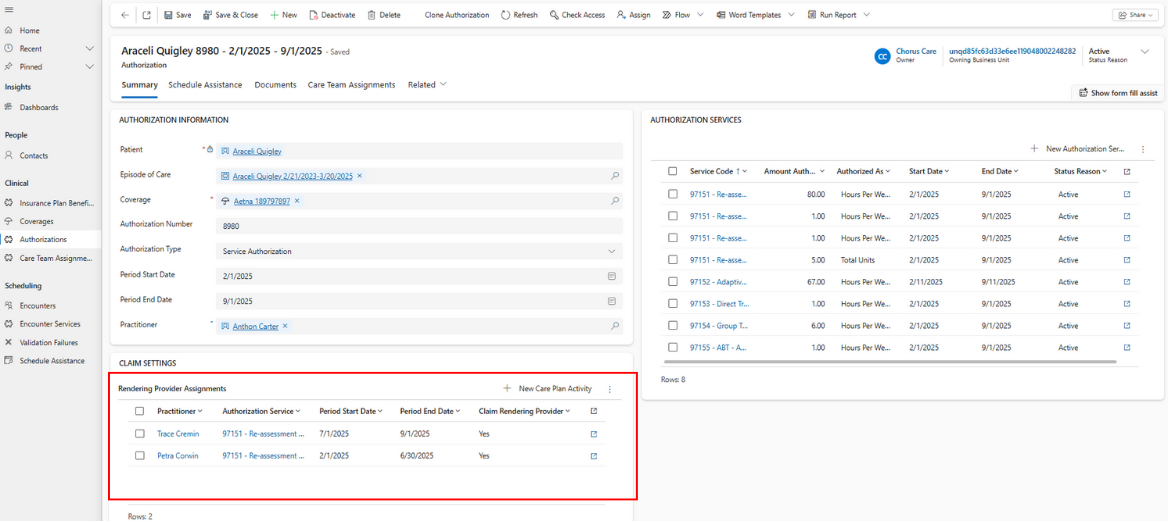
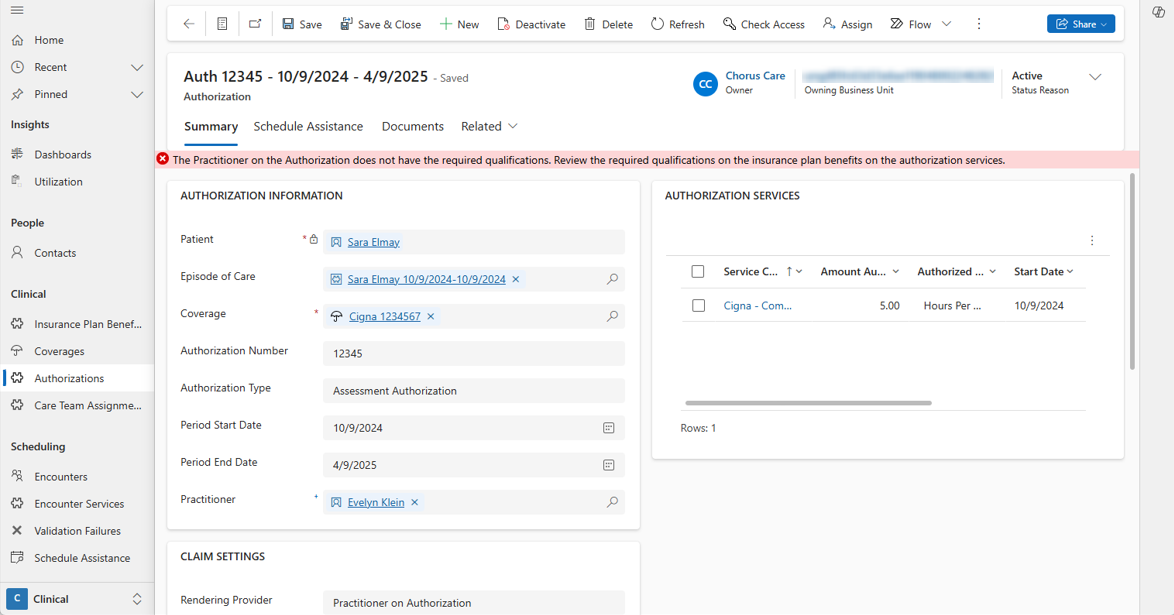
You’ll see the Rendering Provider Assignments on the main page of the authorization, and a banner if that practitioner is missing any required claim qualifications.
With this set-up, if there is a mid-auth change to who should be the rendering provider on the claim, simply place an end date on the previous care team assignment and set the care team assignment for the new practitioner to be a Rendering Provider Assignment as well.
Once a Rendering Provider Assignment is set up for the authorization, the authorization is validated to ensure the practitioner has all of the required claim qualifications for the authorization services on the authorization.
Session Note exports will print the Supervising BCBA for the case based on the rendering provider on the Claim for that session. If there is not yet a claim for the session, Supervising BCBA will be the practitioner on the rendering provider assignment that covers the date of the session.
Billing Provider
- Billing Provider - This field determines which practitioner or group practice should be set as the Billing Provider on the claim. By default, the billing provider is set to be the billing provider set up on the business unit. However, in some scenarios, you may want to have a different practitioner serve as the billing provider for some authorizations. Here, you can select either the practitioner on the authorization, or a different practitioner to be the billing provider on all claims for this authorization.
When a practitioner is selected as a billing provider, the ‘Provider Type’ field on their profile should be populated to ensure the claims are generated properly.
- Business Unit Billing Provider - When the Billing Provider field is set to 'Business Unit', this field displays the Billing Provider field from the Business Unit Main Form.
- Billing Provider on Claim - If the Billing Provider field is set to 'Select New Practitioner', this field displays the Billing Provider on Claim field. Any Practitioner can be selected as the Billing Provider.
Clone an Authorization
When an existing patient is reauthorized by the same coverage, click 'Clone Authorization' on the existing authorization to create a copy of the authorization and its services. After cloning the authorization, be sure to update the authorization # and date range on the authorization, as well as the amount authorized on each authorization service, to ensure they match what was authorized by the payer.
Pending Authorizations
If an authorization is pending approval from insurance, set the status reason to Pending Authorization. Charge items for pending authorizations will not be able to be billed. Once insurance approves the authorization, either set the authorization status reason to active, or create a new authorization and move the relevant sessions to authorization services from the new authorization.
- Reason Pending - Track the reason why this authorization was not approved by the payer yet (late assessment submission, gap in coverage, gap in authorization, or coverage change).
Edit an Authorization
If a patient's coverage changes mid-authorization, rather than editing the authorization, place an end date on the current authorization and create a new authorization against the new coverage. This will allow you to create new authorization services for the insurance plan benefits on the insurance plan of the new coverage.
If there were already care team assignments created for the old authorization, end the care team assignments as of when the coverage changed, and create a new care team assignment for the new authorization service.
If there were already sessions scheduled against the old authorization service or care team assignment, you can move them to the corresponding authorization service on the new authorization.
How to move encounter services to a different authorization service / care team assignment
- Open the new authorization and copy the name of the authorization service you are moving sessions to.
- Open the old authorization, and open the authorization service you are moving sessions away from.
- Go to Related > Encounter Services. Switch to the view 'Active Encounter Services.' Filter to the date of sessions that should be billed against the new authorization.
- Select all, and click 'Edit'.
- Paste the name of the new authorization service in the authorization service field. Click 'Save'. Charge items for sessions that were already billed will be set to Awaiting Resubmission for the biller to review and resubmit to the correct insurance plan.
If there are care team assignments for this authorization service:
- While still on the old authorization service, go to Related > Care Plan Activities, and select a care team assignment.
- Go to Related > Encounter Services. Filter to the date of sessions that should be billed against the new authorization.
- Select all, and click 'Edit'.
- Paste the name of the new care team assignment in the Assignment field. Click 'Save'. Charge items for sessions that were already billed will be set to Awaiting Resubmission for the biller to review and resubmit to the correct insurance plan.
Search Authorizations
Select 'Authorizations' on the left site menu in the Clinical Area of the site menu to open the Authorizations Main Grid. The Authorizations Main Grid is a nested grid; upon clicking on the arrow on the Authorization record, the children Authorization Service records will display. The Authorizations Main Grid has 5 different views:
- The Active Authorizations (default) view displays all active Authorizations in the system. The view is sorted by the Period Start Date with the newer dates displaying first.
- The All Authorizations view displays all Authorizations in the system. The view is sorted by the Period Start Date with the newer dates displaying first.
- The Expiring Authorizations view displays all active Authorizations in the system where the Period End Date is in the next 30 days. The view is sorted by the Period End Date with the older dates displaying first.
- The Pending Authorizations view displays all active Authorizations in the system where the Status Reason is Pending Authorization. The view displays the Reason Pending.
- The Service Authorizations without Rendering Provider Assignments view displays authorizations that do not have any rendering provider assignments set up, so an authorizations admin can easily review and set up rendering provider assignments for these authorizations.
The nested Authorization Service are sorted by the Start Date with the newer dates displaying first.